Snowstorms

034_YosemiteChapelSnowstormSnow falling in front of our lens reduces the visibility of our scene.

This varies a lot based on the amount and the density of snowfall.

A fine dusting fills the air with a light haze, creating a subtle yet visible separation between nearby and distant objects.

Moderate snowfall brings the veiling closer to us and typically isolates nearby subjects from any background distractions.

Of course, a blizzard pretty much obstructs everything, especially at night. Trying to get shots while standing in an arctic like storm in the dark is a lot worse than a bad idea.

On the other hand, photographing in a heavy nocturnal snowstorm is a magnificent experience, albeit challenging, and can produce very dramatic and expressive images.

But there is one technical drawback we must be aware of. Light metering a nighttime shot will not account for the effects of falling snow.

Fast and furiously falling flakes frequently filter the fortune we find in our frame.

And the effect goes beyond the haziness we see with our naked eye. Over time our subject is veiled by a curtain of snow, which masks the light seen by our camera.

During an expanded moment this can cause an exposure decrease of one to two f-stops. The result is like selective exposure imposed by nature that we have no control over.

The solution is to extend our bracketing session by adding one or more longer exposures.

For example, if we think the longest exposure should be 30 seconds, it is a good idea to include exposures of 1 and 2 minutes when photographing in a snowstorm. Otherwise, even the longest shot may turn out to be under exposed.

Merry Christmas and Happy Holidays.

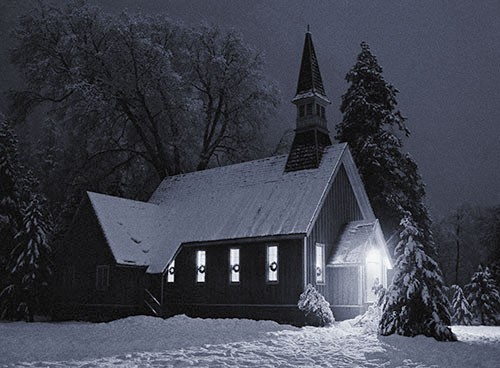
IMAGE : Yosemite Chapel, Snowstorm, Yosemite, CA

Over the years, I’ve spent Christmas in Yosemite more than a dozen times. On Christmas Eve of my last holiday in the park, it began snowing heavily around noon, and continued throughout the night into Christmas morning.

We went to the Chapel for the Christmas Eve service at dusk. After the service, the storm was at its peak, and the snow on the ground was knee-deep. We tromped back to our cabin, then I returned with my camera, tripod and umbrella.

I bracketed up to 2 minutes thinking that was long enough. The next night, on Christmas, I photographed the Chapel again when it was not snowing, using the same exposures.

Turned out a 2 minute exposure was great when it wasn’t snowing, but under exposed by about one f-stop during the snowstorm. After studying my B&W negatives, I realized that the heavy snowfall was actually blocking the exposure.

This final image is the result of a 2 minute exposure shot at f8 with TMAX 3200 film. I have always wished I had taken the time to get a 4 minute shot to capture more in the shadows.

IMAGE TINT : GalleryGoldTonerBlue

In the darkroom, Gold toning produces hues ranging from light to deep blue. Intermediate gold toning produces a noticeable bluish tone. The toning effect was applied to this image to emphasize the look of the snow covered scene at night.

This B&W image was toned in Adobe Photoshop with an ICC Profile derived from the “GalleryGoldTonerBlue” Color Map created in Mac App SuiteProfiler.

Click these buttons to download the ICC Profile and SuiteProfiler Color Map:

EXERCISE : Snowstorms

Instead of waiting for a huge winter storm front to move in, it is best to practice dealing with the technical challenges of photographing in a snowstorm ahead of time.

Set up your camera and tripod in a dark environment, indoor or out, with the foul weather gear you use to protect your equipment. Rehearse managing your exposures while also keeping your camera and lens dry.

Now you are prepared to tackle the challenge of shooting a saturated snow scene safely. Say that 5 times really fast.

Be sure to review the Safety & Precautions page.

FEEDBACK : Snowstorms

Leave comments on this post to share your ideas and experience, or ask questions.

NEXT TIME : “The Unexpected”


Don’t miss my future posts! 

Subscribe to The Art of Night Photography by Email.


Support The Art of Night Photography.

Thank you! 


Fire Trails

029_AbqFireDancerFire trails are a unique form of light trails created by fire in constant motion.

Fire trails are not well defined streams of light like those left by other light sources.

Fire streaking through the air, or running along the ground, creates flames all along the path of movement.

Opportunities to capture fire trails are rare indeed. Contained fires are usually stationary and burn as a hot mass. Out of control fires spread and grow in unpredictable ways, but frequently do create blazing trails along the way.

But let’s be smart. Trying to track down fiery trails in the middle of a fire emergency, like a burning building or a forest fire, might reap spectacular results, but is a lot more dangerous than wise. Not an activity being promoted here.

On the other hand, there are people who perform with fire in a safe and orderly manner. Such activity affords us the opportunity to capture fire in motion as an expanded moment.

Fire trails are a form of light painting in a controlled environment. The difference is that we are recording someone else performing the drawing with light, someone who’s a seasoned veteran and knows how to play with fire.

When we find such an event, it is a chance to capitalize on our practice of photographing light in all of its forms, and an opportunity to capture an uncommon image.

HOW TO : Photograph Fire Trails

Use the suggested f-stop outlined in aperture settings. Typical exposures should be just a few seconds to avoid overlapping trails.

Leave the shutter open only while the fire is in motion to capture the subtle details in the flames. Watch for patterns created by the moving flames to determine when to close the shutter.

Knowing how to photograph fire as outlined in my earlier post is a must.

IMAGE : Fire Dancer, Albuquerque, NM

I had the opportunity to photograph a practice session of a group of fire spinners as a part of my “Rhythm of the Night” portfolio for the Albuquerque Arts Program in 2010.

The fire trails were created by a man swinging burning balls hanging at the end of 2 ropes.

This image is the result of a 4 to 5 second exposure shot at f8 with TMAX 3200 film. It was selected from 2 rolls of film I shot over a period of 2 hours. I captured a lot of variations, but this image was the most unexpected.

  • Mouse over the image above to view the original BW image without toning. If mouse over does not work, go to Fire Trails on my blog.

IMAGE TINT : GalleryFireGolden

The warm to hot toning was chosen to emphasize the fire trails by adding color contrast to the flames. This is a good example of using toning to colorize a black and white image.

This B&W image was toned in Adobe Photoshop with an ICC Profile derived from the “GalleryFireGolden” Color Map created in Mac App SuiteProfiler.

Click these buttons to download the ICC Profile and SuiteProfiler Color Map:

EXERCISE : Fire Trails

Seek out a group or an individual who performs with fire in the night. Get permission to photograph an event or a practice session. Always keep yourself and your camera at a safe distance from the flames.

I cannot emphasize strongly enough that tossing or twirling burning objects around yourself to get shots of fire trails is a really bad idea. As they say, “Do not try this at home.”

Be sure to review the Safety & Precautions page.

FEEDBACK : Fire Trails

Leave comments on this post to share your ideas and experience, or ask questions.

NEXT TIME : “Find Art Photography”


Don’t miss my future posts! 

Subscribe to The Art of Night Photography by Email.


Support The Art of Night Photography.

Thank you! 


Light Painting

025_KolbTugOfWarLight painting is a more dynamic form of supplemental lighting.

In very dark or unlit places, light painting can be used to bring an image to life.

If used exclusively, the creative possibilities are boundless.

The practice of light painting begins by opening our shutter, venturing away from our camera, and exploring the scene with one or more lighting tools in hand.

Then we are free to roam into and around our scene selectively lighting as we go. And of course, we eventually return to our camera and close the shutter.

Light painting is done with common lighting tools, such as flashlights, pen lights, or hand held lasers. Or anything we can dream up that emits light.

As long as we stay on the move, we can operate freely, undetected by our camera, lighting whatever strikes us in the moment, by design or on a whim.

With long exposures, we definitely have the time to create what we want. Plus we can always combine light painting with stationary fill lighting to supplement any existing light.

HOW TO : Light Painting

There are two approaches to light painting:

The first approach is a mobile form of supplemental lighting. You move through the image lighting or highlighting objects or areas with lighting tools, directed away from your lens.

The second approach is to perform in front of your camera with a light source visible to your lens. By drawing light trails, you introduce your camera to your imagination.

Just like writing your name with sparklers when you were a kid, you sculpt an image with light by writing on the wind, and create your own personalized expanded moment.

Light painting is a great opportunity to think a little more radically. Well OK, a lot more radically than usual, and explore your eye in discovery.

There really are no rules or guidelines. Let your imagination run wild. The possibilities are endless. The key is experimentation. So experiment, experiment, experiment … and play.

IMAGE : Tug of War, Edgewood, NM © Stephan Kolb

One assignment in the night photography class I taught at UNM in Albuquerque was light painting. Stephan showed up with his rendition of four men competing at tug of war.

What is so incredible about this image is how expressive it is. The simple lines of light truly portray the strain and struggle of the figures.

First, he hung a light rope between two stakes. Then he had a friend take on each posture, while he drew the outline with a pen light.

This was done in complete darkness, which hid the existence of his activity. Talk about dynamic. Quite a creation from an inventive mind.

The image is a 139 second exposure shot at f2.8 with a focal length of 24mm.

You can see more of Stephan’s work on Flickr and Tumblr.

EXERCISE : Light Painting

Experiment with both styles of light painting. Find a scene with a large area that needs fill lighting. Use a flashlight to paint the dark parts with light as you move through the frame.

Also, try drawing a scene for the camera with a small light source. You can draw just what comes to you in the moment, or plan the picture ahead of time.

Compare the resulting images to what you imagined while painting or drawing. Take the time to fine tune your light painting techniques. But most of all, have fun.

Be sure to review the Safety & Precautions page.

FEEDBACK : Light Painting

Leave comments on this post to share your ideas and experience, or ask questions.

NEXT TIME : “Fire”


Don’t miss my future posts! 

Subscribe to The Art of Night Photography by Email.


Support The Art of Night Photography.

Thank you! 


Selective Exposure

PointArenaLighthouseFogPhotographing at night means taking long exposures and capturing all our camera sees.

But we don’t have to take it any longer!

Wait, let me rephrase that. That doesn’t mean we don’t need to take long exposures to capture our expanded moments.

It just means we don’t have to accept everything the world happens to throw at us while our shutter remains open.

If we don’t want to record intermittent interference from extraneous light sources, we don’t have to. If we don’t want to capture the interplay of light trails streaming through our image, we don’t have to. And if we don’t want to include momentary lens flaring that comes our way, we don’t have to.

During a lengthy exposure, we can actually pick and choose from what we are given to design the expanded moment we desire.

We can anticipate the expected, or respond spontaneously to the unexpected. In either case, we must remain vigilant to exclude the wrong moments at the right time.

Selective editing gives us the opportunity to create a more distinct image of finer quality, something unseen in continuous time by our naked eye.

Editing during image capture is not the same as altering an image after the fact. It expands our potential for capturing images that cannot be created through image editing alone.

HOW TO : Selective Exposure

The goal is to shield our camera from unwanted repetitive or one-time intrusions of light by simply blocking and unblocking our lens during a long exposure.

  • block your lens with a black card or clothe as needed
  • make sure no light is shining on the card, or your camera will record that as well
  • stay attentive to react quickly when the undesirable moments occur
  • remember: effective exposure = total exposure – lens blocking time

IMAGE : Point Arena Lighthouse, Point Arena, CA

  • Mouse over the image above to view the scene without selective editing. If mouse over does not work, go to Selective Exposure on my blog.

The fog caught the light beam as it circled the lighthouse. I had to climb over two fences to reach my ideal vantage point near the edge of the cliffs overlooking the ocean below.

While I watched and waited during 1, 2, 4 and 8 minute exposures, I was blinded by the light beam every time it circled then faced me and my camera.

I decided to try one last exposure as a first time experiment. I visualized an image of the beam shining only out to sea, to the left. So I blocked the lens with a black card while the beam was shining at me and to the right. Success demanded my undivided attention.

The altered image was shot at f8 with TMAX 3200 film. The effective exposure was about two minutes, captured during a total exposure of around 6 minutes.

The unedited exposure was 2 minutes, also shot at f8 with TMAX 3200 film.

IMAGE TINT : GallerySeleniumGoldToner

In the darkroom, Selenium toning combined with Gold toning creates a purplish hue in the darker tones and a cool bluish gray tint in the highlights. The toning effect was selected to enhance the look of the light beam caught in the foggy night air.

This B&W image was toned in Adobe Photoshop with an ICC Profile I generated from my Mac App SuiteProfiler. The Profile was derived from the “GallerySeleniumGoldToner” Color Map created in SuiteProfiler.

Click these buttons to download the ICC Profile and SuiteProfiler Color Map:

EXERCISE : Selective Exposure

Find a nighttime scene affected by occasional, and undesirable, lighting changes.

Practice blocking the lens during an exposure to remove any unwanted lighting effects. Don’t forget to subtract the lens blocking time from your total exposure. That is, make sure your effective exposure does not include the time you spend blocking the lens.

For example, perform selective editing to remove lighting due to passing car headlights. Block your exposure before the car headlights shine on the scene. Unblock the lens once the car has passed.

Be sure to review the Safety & Precautions page.

FEEDBACK : Selective Exposure

Leave comments on this post to share your ideas and experience, or ask questions.

NEXT TIME : “Light Intensity”


Don’t miss my future posts! 

Subscribe to The Art of Night Photography by Email.


Support The Art of Night Photography.

Thank you! 


Lens Flare Haze

SalemDryDockOur dance with lens flare consists of many different steps.

And our performance can take place before, during and after image capture.

It is easy to believe that managing artifacts and haze means letting lens flare take the lead, then following with work arounds.

But our assumptions can easily blind us from seeing some artistic potential inherent in lens flaring.

It doesn’t have to be just about repair and recovery work.

Instead of dancing around the effects of flaring, we can take the lead by taking the time to notice the presence, and the presents, of lens flare haze.

Haze gives us the opportunity to add a more dramatic or less common look to an ordinary image, a chance to take advantage of an optical side effect for visual impact sake.

HOW TO : Lens Flare Haze

When a bright light source is outside of the frame, but still shining on the lens, lens flare can appear as haze washing over the image, creating a ghostly appearance.

Capturing this synthetic fog is not an exact science, it varies among lenses. It generally takes some experimentation to see it, and then find what appeals to you most.

Start by composing your image with a single light source right at the edge of the frame. Remove your lens shade to allow the light to strike the lens fully.

Zoom in until haze begins to appear, then fine tune your zooming for maximum hazing.

Depending on the focal length, the light source should be just outside of your line of fire, without encroaching on the image directly. Wide angle lenses catch hazing more readily.

To find the optimal lens-to-light angle, you may also need to reposition your camera backward or forward, then perform zooming again.

Double check there are no lights along the edge of the frame during image capture. You must keep light sources out of the image completely to record haze as purely as possible.

Experiment with multiple light sources outside of the frame for varying results.

IMAGE : Dry Dock, Salem, MA

I was experimenting with different compositions of the Salem Boat Yard on a clear night, when I discovered hazing on my lens from the nearby light sources.

I completed my dance by adjusting the lighting imbalance with luminosity painting in Photoshop, by burning through the “Darks” mask, and dodging through the “Lights” mask.

This image is the result of bracketing then selecting the 15 second exposure shot at f8 with TMAX 3200 film.

  • Mouse over the image above to view the original hazing before luminosity painting. If mouse over does not work, go to Lens Flare Haze on my blog.

IMAGE TINT : GallerySilverLite

The light silver toning, applied to the Salem Boat Yard taken the same night, was used again to cool the ghosting effect of the haze.

This B&W image was toned in Adobe Photoshop with an ICC Profile I generated from my Mac App SuiteProfiler. The Profile was derived from the “GallerySilverLite” Color Map created in SuiteProfiler.

Click these buttons to download the ICC Profile and SuiteProfiler Color Map:

EXERCISE : Lens Flare Haze

When photographing a scene with nearby light sources, experiment by positioning your camera to capture the lens flare haze produced by one or more lights outside of the frame.

Balance any uneven lighting afterward by burning and dodging via luminosity painting.

Be sure to review the Safety & Precautions page.

FEEDBACK : Lens Flare Haze

Leave comments on this post to share your ideas and experience, or ask questions.

NEXT TIME : “Return to the Scene”


Don’t miss my future posts! 

Subscribe to The Art of Night Photography by Email.


Support The Art of Night Photography.

Thank you! 


Lens Flare Recovery

CarlsbadEngineLightsNot a 12 step program, at least not the kind we usually hear about.

“Hello my name is Dana, and I’m a night photographer.”
<Hi, Dana!>
“I have been lens flare free for more than a month now.”
<applause>
“But now I am ready to get out there and try to control it again.”
<crickets>

OK, OK … lens flare cannot be controlled, but it can be tamed.

Restoring our images to full integrity, in spite of lens flare, is the challenge.

When we find bright lights staring back at us, it is a safe bet there will be lens flare. And we can begin the recovery process during image capture.

  • The Problem: Lens flare artifacts and haze can easily ruin image details, cause color changes, and introduce unwanted visual distractions.
  • The Solution: Make sure we capture all of our subject matter by shooting multiple image variations along the vertical or horizontal axis. By photographing a scene at different angles, we gain the potential for restoring an image 100%.
  • The Secret To Recovery: Rebuild the damaged features by blending two or more varying compositions, replacing the aberrations with authentic image details.
  • Mouse over the image to view the original shot before recovery. If mouse over does not work, go to Lens Flare Recovery on my blog.

HOW TO : Lens Flare Recovery

First capture your image variations:
1. compose your desired image, perform bracketing session
2. alter camera angle, no more than a 35% change from initial frame, to shift flaring
3. perform bracketing session
4. repeat previous two steps for additional exposures at different angles (optional)

Before any image editing, combine two or more image variations in Photoshop:
5. layer your images taken at different angles, all shot at the same exposure
6. select all layers, perform “Edit > Auto-Align Layers” with “Auto” projection
7. zoom in to check that alignment was successful, move layers to align if necessary
8. change the Blend of all but the bottom layer to “Darken”
9. add “Layer > New Adjustment Layer > Levels…” with a “Clipping Mask” to adjust layers where flare shows through (optional)
10. select and merge all layers
11. perform “Filter > Distort > Lens Correction” to adjust perspective to original
12. crop image to original composition, or as you see fit

There ya go, 12 steps.

This should remove all or most of the lens flare. Depending on your camera angles, you may need to supplement blending with some touch-up work.

IMAGE : Engine Lights, Carlsbad, NM

I set up my camera and tripod as the train engine backed into the railyard at midnight. I first composed the image I wanted, which was not easy.

The lights were extremely bright, almost blinding, especially through my viewfinder. I realized there’d be plenty of lens flare, but I saw what I wanted, and I knew how to get it.

After my initial round of bracketing, I repeated my exposures two more times. First by pointing my camera downward about 30%, then upward to center the flaring circles around the light sources.

I was lucky. The engine lights stayed on during all of my exposures, then off shortly after.

Moving the flare to different areas of the frame gave me plenty to work with. I ended up blending the original image with the downward facing shot, then cropped off the bottom.

Removing the lens flare artifacts puts more attention on the subtle rays of light glowing from the face of the engine.

The final image is the result of blending two 30 second exposures shot at f11 with TMAX 3200 film.

IMAGE TINT : GalleryAshBrown

The grayish brown tint was created to convey the look and feel of the soot filled railyard.

This B&W image was tinted in Adobe Photoshop with an ICC Profile I generated from my Mac App SuiteProfiler. The Profile was derived from the “GalleryAshBrown” Color Map created in SuiteProfiler.

Click these buttons to download the ICC Profile and SuiteProfiler Color Map:

EXERCISE : Lens Flare Recovery

Next time you photograph a scene with light sources, experiment with the steps outlined above to recover the image details muddled by lens flare.

Be sure to review the Safety & Precautions page.

FEEDBACK : Lens Flare Recovery

Leave comments on this post to share your ideas and experience, or ask questions.

NEXT TIME : “Lens Flare Haze”


Don’t miss my future posts! 

Subscribe to The Art of Night Photography by Email.


Support The Art of Night Photography.

Thank you! 


Lens Flare Repair

SalemBoatYardYes, Virginia, there is lens flare.

Even if we use lenses that reduce the effects of flare, the potential is still out there, waiting to pounce when we least expect it.

And there is nothing we can do about it …

Or is there? Well, Yes and No. Lens flare cannot be stopped, but it can be repaired.

  • Mouse over the before image to view the results of lens flare repair. If mouse over does not work, go to Lens Flare Repair on my blog.

Flaring artifacts vary in size, and can spread across the image. Like aperture starring, their intensity depends on the strength of the light sources, and changes with aperture settings.

The greatest challenge is that flaring haze and artifacts wash out underlying image details, usually accompanied by color shifts.

Traditionally, prints have been repaired manually by applying spotting inks. This takes time and patience, a whole lot of practice, and must be repeated for every print.

Digital editing can be much more exacting, goes straight to the source of the problem, and only needs to be done once per image.

There are plenty of instructional guides and videos on the internet offering various plans of attack in Photoshop. Here is one approach to fixing this inevitable reality:

HOW TO : Lens Flare Touch-Up

The first step is to decide which flaring effects are desirable, then touch-up the rest.

The toughest part of touch-up is removing the flare marks seamlessly. The goal is to break up the patterns to remove the visual distractions.

One method is to use the Clone Tool to return details to washed out areas.

Another means is to burn and dodge flare spots where there is little or no details to restore. The best approach is to perform luminosity painting through a luminosity mask on a Soft Light layer above the image layer.

For complex artifacts, a combination of the two techniques can be most rewarding.

HOW TO : Luminosity Painting

Thanks to Tony Kuyper, who has written many fine tutorials on the subject of Luminosity Masks, a versatile set of tools for image editing.

Start with Luminosity Masks for a general description of the masking techniques.

Read Luminosity Painting for specifics on burning and dodging through luminosity masks.

Go here for an index of masking topics.

IMAGE : Boat Yard, Salem, MA

In 1692, my ancestor Susannah Martin was one of the first women hung at the Salem Witch Trials. I went to Salem to visit the Witch Trials Museum and Memorial. As I drove out of town that night, I came across this boat yard. It was well lit, but still kind of spooky.

The double lights on each side of the boats were very bright, causing extreme starring and flaring, especially with a small aperture. All of this was obvious in the viewfinder.

Trying to touch-up a darkroom print by hand was quite frustrating. Using both luminosity painting and cloning in Photoshop proved to be successful.

This was a 30 second exposure shot at f16 with TMAX 3200 film.

IMAGE TINT : GallerySilverLite

A light silver toning was applied to the image to cool the highlights.

This B&W image was toned in Adobe Photoshop with an ICC Profile I generated from my Mac App SuiteProfiler. The Profile was derived from the “GallerySilverLite” Color Map created in SuiteProfiler.

Click these buttons to download the ICC Profile and SuiteProfiler Color Map:

EXERCISE : Lens Flare Repair

Take night shots of a scene with bright light sources that create lens flare. Clean up the image artifacts by following the guidelines for Luminosity Painting.

This is good practice for any kind of touch-up work.

Be sure to review the Safety & Precautions page.

NEXT TIME : “Lens Flare Recovery”


Don’t miss my future posts! 

Subscribe to The Art of Night Photography by Email.


Support The Art of Night Photography.

Thank you! 


The Eye in Discovery

011_StanfordPointsOLightThere is more to night photography than meets the eye.

Pioneer photographer Philip Hyde said, “A photographer has to look around.”

Not the most inspiring quote I’ve come across, but still a good reminder.

Unfortunately, he left out the main ingredient, “… and take notice”.

Because looking without noticing is like hearing without listening.

It is our intention that matters the most when we are looking around, so we should also ask ourselves, “What am I not noticing?”

This is the visual discovery process in a nutshell.

With short exposures, we usually capture what we notice with the naked eye. Our images pretty much reflect what we observe in a single moment, a snapshot in time.

But when photographing at night, “noticing” takes on a-whole-nother dimension. Spotting our subject matter in the dark is only where the challenge begins.

We have to look into the night with our mind’s eye to anticipate how changes in light and lighting will unfold during a long exposure.

We must train our mind’s eye to see beyond the current moment, to view the not yet seen. And learn to visualize the possibilities in time, to capture the not yet scene.

One of the best ways to train our mind’s eye for discovery is through experimentation.

During nighttime exposures, we have the time to survey our surroundings, envision how movement and change will affect the final image, then dream up experiments with light to expand our photographic intuition.

It is with this eye towards change and the expanded moment, that we open the door to a much richer spectrum of image making.

IMAGE : Points O’Light, Stanford University, Palo Alto, CA

This is one of my images I call “experiments gone right.”

The Rodin Sculpture Garden is dramatically lit at night. When I noticed three street lights in the distance, I composed with them in mind to see how the camera would treat them.

I beheld a trio of lights at the tip of his finger.

The lights grew brighter, and I heard them saying,
“Come hither, share what is in your heart.”

I gave pause, then asked,
“How do I learn to photograph at night?”

The lights burned, turned to stars, and spoke again,
“The answer lies within your question.”

I pondered on this, then replied, “Huh?”

The stars decreased, the lights dimmed, the voices whispered,
“Sorry, you only get one question.”

My discovery: Since aperture starring occurs in the camera, the stars advanced forward in the image. The result: The 3 stars seem to emerge from the finger tip of the sculpture.

My experiment taught me something to look for in the future. Plus it added a personal touch to the image (pun intended).

This image is the result of bracketing then selecting the 2 minute exposure shot at f16 with TMAX 3200 film.

IMAGE TINT : GallerySilverLite

A light silver tint was applied to the image to accentuate the sculpture’s metallic highlights.

This B&W image was tinted in Adobe Photoshop with an ICC Profile I generated from my Mac App SuiteProfiler. The Profile was derived from the “GallerySilverLite” Color Map created in SuiteProfiler.

Click these buttons to download the ICC Profile and SuiteProfiler Color Map:

EXERCISE : The Eye In Discovery

The next time you go out at night, look around and notice any movement or change in light. Imagine how that might appear in a long exposure.

Entertain ideas on how to capture the changes that are visually compelling.

If you are uncertain how these changes might materialize in a final image, think up some experiments to try the next time you photograph at night.

This is a great way to practice seeing the possibilities with your mind’s eye.

Be sure to review the Safety & Precautions Page.

NEXT TIME : “Lens Flare”


Don’t miss my future posts! 

Subscribe to The Art of Night Photography by Email.


Support The Art of Night Photography.

Thank you!